
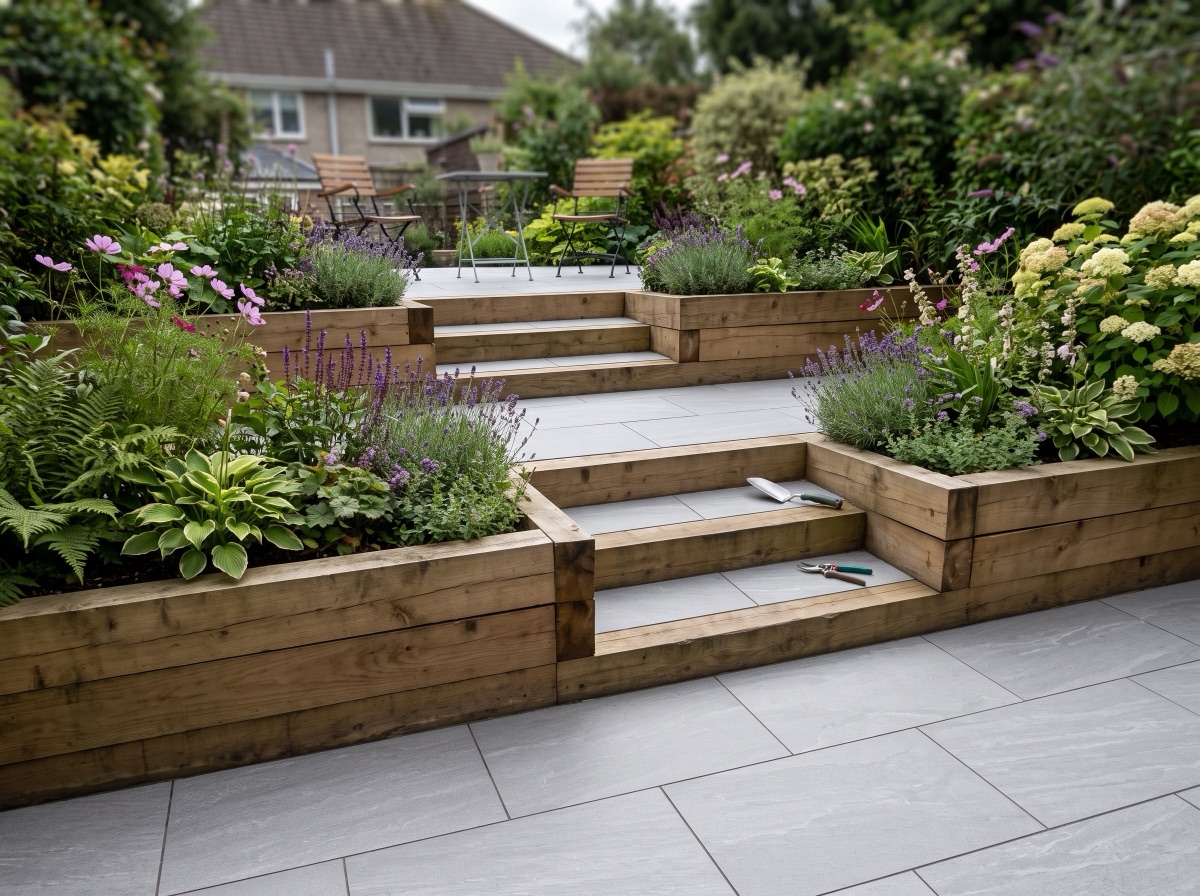
Terracing turns a slope into a series of level, usable platforms: survey the fall, design levels around a comfortable step height, build retaining structures with drainage behind them, then pave each level like a normal patio. Walls retaining much over 600mm need engineering input — plan that early.
A sloping garden isn't a problem — it's a design opportunity paid for in retaining walls. Terracing carves the slope into level platforms you can actually use, and the method is the same whether you're making one seating terrace or a whole stepped garden: measure the fall, set level lines a comfortable step apart, retain each change of level properly (with drainage behind every wall), and pave each platform like a normal patio. The one hard rule: anything retaining much more than 600mm of ground is structural work — get engineering input before you build it.
Before you dig: what the slope is telling you
Walk the slope after heavy rain first. Where water tracks and where it sits will decide your drainage plan — terracing interrupts natural flow, and every terrace you cut needs somewhere for that water to go. Note, too, what the neighbours' ground does at the boundaries: changing ground levels against a shared boundary or building has legal and structural implications (party walls, foundations, fences), and it's far easier to design around them than to argue about them later.
Step 1: Measure the fall
You need one number to design everything: the total drop across the terraced area. The classic DIY method needs only a straight timber, a spirit level and a tape — hold the timber level from the high point, measure down to the ground at its far end, move down the slope and repeat, adding the measurements as you go. A 10m garden dropping 1.5m, for instance, gives you the raw material for two or three generous terraces.
Step 2: Design the levels
Divide the total fall into platforms that suit how you'll use them: a dining terrace wants to be generous (aim for room around a table, not just under it), a route-through terrace can be narrower. Keep each level change comfortable — multiple modest walls of 300–600mm feel like a designed garden and stay out of structural-engineering territory, where one tall wall does neither. Sketch it in section, not just in plan: riser heights between levels should divide neatly into standard step risers (around 150–200mm each) so the staircases fall out of the design naturally. For the look-and-feel decisions on each platform, the terrace design guide picks up where this build guide stops.
Step 3: Choose your retaining structures
- Masonry walls (concrete block, faced or rendered; brick; natural stone) — the premium, permanent choice, built off proper concrete footings. Stone walling (e.g. sandstone walling blocks) pairs naturally with stone or porcelain paving above.
- Sleeper walls — fast, warm-looking and DIY-friendly for modest heights, fixed to posts concreted into the ground; expect a shorter life than masonry, and use treated timber rated for ground contact.
- Gabions — stone-filled baskets that drain through themselves and suit contemporary schemes; they need volume, so they eat space on small plots.
The threshold that matters: low garden walls retaining a few hundred millimetres are a competent DIY or landscaper job. Once a wall retains much over 600mm — or carries any surcharge like a patio, path or parked car above it — the loads grow rapidly and the wall needs proper structural design. That's not red tape; retained earth is heavy and saturated earth is heavier.
Step 4: Get the drainage right behind every wall
More retaining walls fail from water than from weight. Every wall needs: a free-draining gravel backfill zone behind it, a perforated land drain at its base carrying water to a lawful outfall (soakaway, ditch or surface-water drain), and weep holes through the wall face so pressure never builds. On the platforms themselves, pave with a 1:80 fall towards a drained edge, never towards the wall or the house — the same falls discipline as the complete patio guide.
Step 5: Build the steps between levels
Steps knit the terraces into one garden. Keep every riser in a flight identical (around 150–200mm), make treads generous (300mm+), and give each tread a slight forward fall so water sheds. Anti-slip porcelain treads are the right surface for outdoor steps — the steps guide covers ratings, nosings and lighting. Light the flights: terraced gardens are used at night more than flat ones, because the destination terrace is the view.
Step 6: Pave each level like a patio
Each platform is now just a small patio: excavate to formation, compact, 100mm+ of compacted MOT Type 1, full mortar bed, primed slabs, joints filled (ground-prep guide / jointing guide). Two terrace-specific notes: compact fill on the cut-and-fill zones especially well (fresh fill settles; paving on it settles with it — build up in compacted layers), and run one consistent slab across all levels — a single surface like Kandla Grey makes a stepped garden read as one composed space. Size each level with the coverage calculator and order the whole scheme in one batch to avoid shade variation between terraces.
Costs, honestly
Terracing costs more than flat paving because you're buying walls, footings, drainage and muck-away as well as the surface — and the structural share grows with wall height, which is another argument for several low terraces over one dramatic one. We can price the visible layer precisely (the paving cost guide has real per-m² catalogue prices); the groundworks share is a local-quote item that varies with slope, access and soil. Get quotes against a written spec that includes the drainage detail — it's the part cheap quotes silently omit.
Work out your exact order in seconds
Our coverage calculator turns your patio size into the precise number of slabs and packs — 10% waste allowance included.
Free delivery, £0.98 samples, breakage guarantee
Every order ships free with no minimum spend. Order a £0.98 sample first, choose your delivery date, and if a slab arrives broken we replace it — no quibbling.
Frequently asked questions
How do you terrace a sloping garden?
Measure the total fall, divide it into level platforms separated by comfortable wall heights, build retaining structures off proper footings with gravel backfill, land drains and weep holes, connect the levels with consistent steps, then excavate, sub-base and pave each platform like a normal patio.
Do I need planning permission to terrace my garden?
Often not for modest garden landscaping, but significant changes of ground level, high walls, work near boundaries or in conservation areas can need consent — and walls retaining much over 600mm or carrying loads need structural design regardless. Check with your local authority before major regrading.
How high can a garden retaining wall be without an engineer?
As a widely used rule of thumb, walls retaining up to about 600mm of ground with no surcharge above are within competent DIY/landscaper territory. Above that — or with a patio, drive or slope pressing on the wall — get structural engineering input. Saturated retained earth exerts serious force.
What is the cheapest way to terrace a slope?
Several low retained level changes using sleepers or blockwork, cut-and-fill balanced so you cart little soil away, and paving concentrated on the terraces you will actually use, with planting holding the banks between them. Avoid one tall wall — it is where the money goes.
Why do retaining walls fail?
Water, more often than weight: no drainage behind the wall lets pressure build until the wall leans or bursts. Every retaining wall needs free-draining backfill, a land drain at the base and weep holes — plus footings sized for the height and loads above.
What paving is best for a terraced garden?
One consistent, batch-stable surface across all levels reads best — porcelain suits terraces because colour stays consistent between platforms and steps, needs no sealing, and anti-slip finishes handle the flights between levels. Order the whole scheme in one batch.