
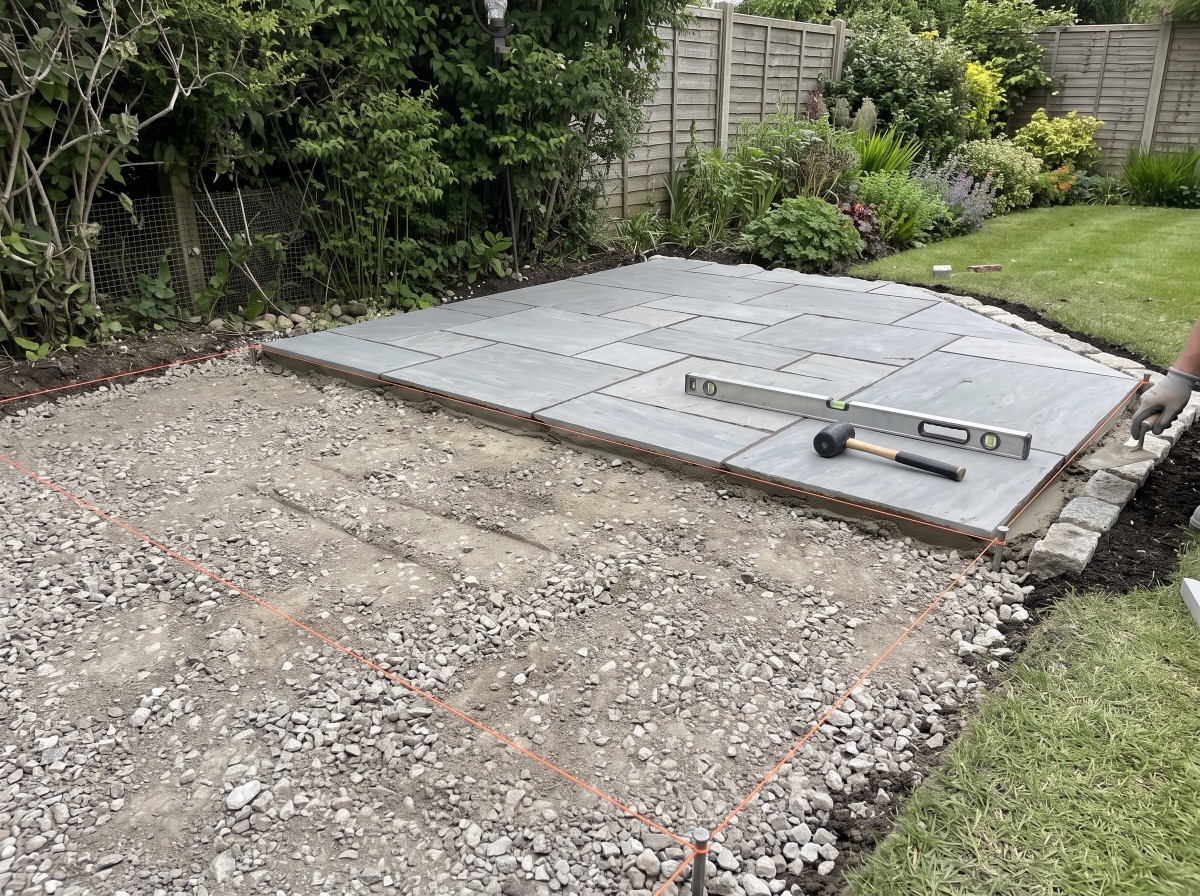
Laying a patio is a nine-step project: plan and mark out with falls, excavate ~150mm, compact the ground, build a 100mm+ MOT Type 1 sub-base, screed a full mortar bed, prime and lay the slabs, then joint, cure and maintain. Here is the complete method from first string line to first barbecue.
A patio is a groundworks project with a pretty top layer. Ninety per cent of patio failures — rocking slabs, ponding water, cracked corners — are base and drainage problems, not slab problems. Get the sequence right (plan, dig, compact, sub-base, mortar bed, lay, joint) and almost any quality slab will sit flat for decades. This guide walks the whole project in order, with the depths, falls and mixes UK installers actually use.
Before you start: planning decisions that save money
- Size and position. Map the sun through the day — an evening-sun patio often belongs away from the house. Mark the outline with pegs and string and live with it for a weekend before digging.
- Levels. Finished paving must sit at least 150mm below any damp-proof course and needs a fall of at least 1:80 (12.5mm per metre) away from the building so rain runs off.
- Drainage. Where the patio meets lawn or borders, water can escape naturally. If it's enclosed by walls, plan a drainage channel or gully before you lay a single slab.
- Material. Porcelain is batch-consistent and never needs sealing; natural sandstone is warmer in character and usually cheaper per pack — the comparison guide covers the trade-offs, and a sample settles the colour question cheaply.
- Quantities. Run your dimensions through the coverage calculator — it converts area to slabs and whole packs and builds in a cutting/breakage allowance, so you order once.
Tools and materials checklist
- Tools: spade and mattock, wheelbarrow, pegs, string line and line level, tape measure, long spirit level and straightedge, plate compactor (hire), rubber mallet, brick trowel, angle grinder or wet saw with a diamond blade, knee pads.
- Materials: MOT Type 1 sub-base, sharp sand and cement, priming slurry (essential for porcelain), your slabs, and a jointing compound or pointing mortar.
- Safety: gloves (cement burns), eye and ear protection, and wet cutting or an FFP3 mask for any cutting — dry-cut silica dust is a genuine health hazard.
Step 1: Mark out and set your levels
Drive pegs at each corner and connect them with string lines set at the finished paving height, building in the 1:80 fall away from the house. Check the diagonals are equal to square the layout. These lines are the project's single source of truth — every later stage is measured off them.
Step 2: Excavate the area
Dig out roughly 150mm below finished level across the whole footprint: all turf, topsoil and roots must go, down to firm subsoil. The made-up depth is typically 100mm+ of compacted sub-base, a 30–50mm mortar bed, plus the slab. Soft, spongy pockets get dug out and refilled with sub-base material — never left in.
Step 3: Compact the exposed ground
Two passes with the plate compactor over the subsoil. This exposes weak spots while they're still cheap to fix. If you're laying onto heavy clay, add sub-base depth rather than gambling — the ground-preparation guide covers difficult ground in more detail.
Step 4: Build the sub-base
Spread MOT Type 1 in 50–75mm layers, compacting each one, to at least 100mm compacted depth (150mm+ on clay). Rake the final surface parallel to your string lines so the falls are already built into the base. A properly compacted sub-base feels like rough concrete underfoot — you shouldn't be able to kick stones loose.
Step 5: Mix and screed the mortar bed
Mix sharp sand and cement at roughly 4:1 to a moist, semi-dry consistency — it should hold its shape when squeezed without water running out (the mixing-ratios guide explains the variations). Lay a full bed 30–50mm thick for each slab as you go. Never "spot bond" with five dabs — the voids crack slabs, drum underfoot and collect water.
Step 6: Prime and lay the slabs
For porcelain, brush a cement-based priming slurry onto the back of every slab immediately before laying — porcelain is too dense to bond to mortar without it (the laying guide shows the technique; the adhesives guide covers bonded overlays). Lower each slab onto the bed, tap it down to the line with a rubber mallet, and check both directions with the spirit level. Keep joints consistent at 8–10mm using spacers.
Step 7: Cut the edges properly
Plan the layout so cut pieces land at the least visible edge, and never lay a sliver — adjust the joint layout instead. Cut with water suppression or proper dust extraction, and place cut edges against walls or borders where the factory edge can't be seen. Full technique, blade choice and safety are in the cutting guide.
Step 8: Joint the patio
Leave the bed to firm up for 24–48 hours, then fill the joints — brush-in jointing compound for speed, or a wet pointing mortar for the traditional finish. The grouting guide compares methods and the mix-ratio guide covers proportions. Unfilled joints are how water, frost and weeds get into your bed.
Step 9: Cure and look after it
Keep foot traffic off for 24–48 hours after laying and respect the jointing product's cure time before furniture goes out. After that, maintenance is modest: an occasional wash (see the porcelain cleaning guide), and re-topping jointing if it ever erodes. Porcelain needs no sealing; natural sandstone benefits from an impregnating sealer once it has weathered in.
How long does it take?
For a typical domestic patio, a realistic DIY schedule is one weekend for excavation and sub-base, one weekend for laying, plus a jointing session once the bed has set. Pallet delivery needs kerbside access for an offload vehicle — check the delivery page for what to expect before you book time off.
Choosing the slabs
Browse the porcelain range or Indian sandstone range, or start from the flagship Kandla Grey family if you want the grey that goes with everything. Whatever you shortlist, order samples first — colour on a screen and colour against your brickwork are different things.
Work out your exact order in seconds
Our coverage calculator turns your patio size into the precise number of slabs and packs — 10% waste allowance included.
Free delivery, £0.98 samples, breakage guarantee
Every order ships free with no minimum spend. Order a £0.98 sample first, choose your delivery date, and if a slab arrives broken we replace it — no quibbling.
Frequently asked questions
What do you put down before laying a patio?
After excavating to firm subsoil, compact the ground and build at least 100mm of compacted MOT Type 1 sub-base, then bed each slab on a full 30–50mm semi-dry mortar bed. Slabs are never laid straight onto soil or onto loose hardcore.
How deep do you dig for a patio?
Around 150mm below the finished paving level: 100mm+ of compacted sub-base plus a 30–50mm mortar bed plus the slab thickness. Dig deeper where the ground is soft or clay-heavy.
Do you need cement to lay a patio?
For a patio that stays flat, yes — a full sand-and-cement mortar bed is standard UK practice. A screeded sharp-sand bed without cement is only appropriate for light-duty paths, and porcelain always needs a mortar bed with a priming slurry.
What fall does a patio need?
At least 1:80 — about 12.5mm of drop per metre — running away from the house or any wall, so rainwater sheds off the surface instead of pooling or tracking back to the building.
Can I lay a patio myself?
A competent DIYer can: the skills are digging, compacting, screeding and levelling rather than anything exotic. Budget two to three weekends for a typical patio, hire a plate compactor, and get the base right — that is where the durability lives.
How soon can you walk on a new patio?
Keep off it for 24–48 hours so the bedding mortar can set, then joint it and follow the jointing product's stated cure time before normal use and furniture.