
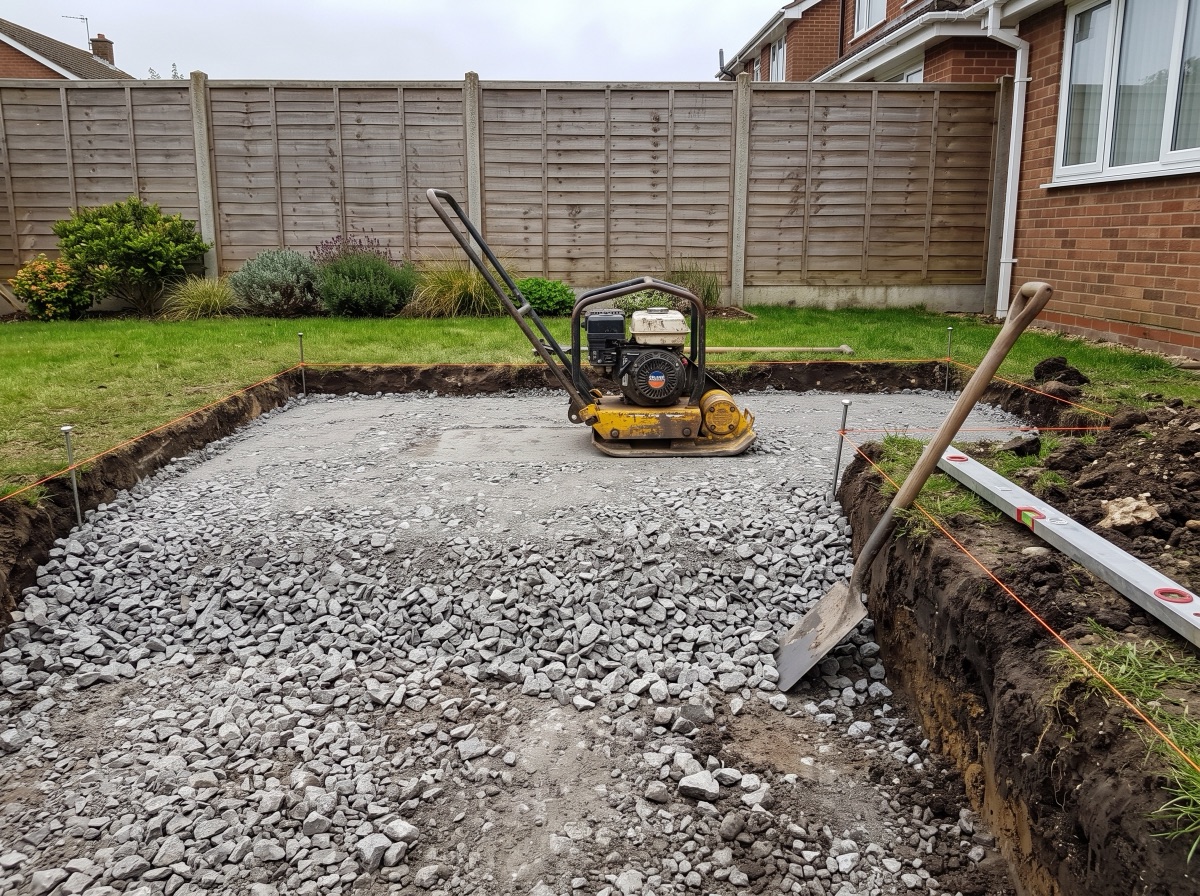
A domestic patio needs roughly 100mm of compacted MOT Type 1 under a 30-40mm bedding layer and the slab itself. Driveways need 150mm or more. Compact in shallow layers with a vibrating plate, and build in a fall of about 1:80 away from the house before you lay a single slab.
For a domestic patio, allow around 100mm of compacted MOT Type 1 sub-base, a 30-40mm bedding layer and the thickness of your slab. Driveways and anything taking vehicle loads need 150mm or more. Compact the sub-base in shallow layers with a vibrating plate, and set a fall of about 1:80 running away from the house before the first slab goes down.
Why the sub-base decides whether the patio survives
Almost every patio failure people describe as a "slab problem" is really a ground problem. Slabs that rock, sink at one corner, or open up their joints after a winter are usually sitting on ground that was never able to carry them. The slab and the mortar bed spread load; the sub-base is the layer that actually carries it down into the subsoil and stops seasonal ground movement reaching the surface.
This matters more in the UK than the internet often admits, because a lot of British subsoil is clay. Clay swells when wet and shrinks when dry, and it does that every year. A properly compacted granular sub-base is what separates your finished surface from that movement.
Working out your dig depth
Dig depth is not a fixed number — it is the sum of the layers you are about to build. Work from the finished level downwards:
- Slab thickness — 20mm for most outdoor porcelain, 22mm for calibrated Indian sandstone, 30mm+ for driveway-rated porcelain (see the thickness guide).
- Bedding mortar — 30-40mm of full-bed mortar for a patio.
- Compacted sub-base — around 100mm for foot traffic; 150mm or more for vehicles.
So a typical 20mm porcelain patio works out at roughly 150-160mm of excavation below the finished paving level, and a 22mm sandstone patio at much the same. Measure and mark this before you start rather than digging to a remembered number — the arithmetic changes the moment your slab thickness does.
Two constraints override that calculation. The finished paving must sit at least 150mm below the damp-proof course of any building it meets, and it must fall away from that building. If those two cannot both be satisfied, the levels need rethinking before anything else happens.
What MOT Type 1 actually is
MOT Type 1 is not a brand — it is a specification. The name comes from the Department for Transport's Specification for Highway Works, where Clause 803 defines a graded crushed aggregate for use as a sub-base. In practice it is crushed rock, limestone or recycled concrete, graded from roughly 40mm stone right down to dust.
That grading is the whole point. The range of particle sizes lets the material lock together under compaction, with the fines filling the voids between the larger stone. It is why MOT Type 1 goes rigid when it is compacted properly and why single-sized gravel, which cannot interlock, is not a substitute.
How much sub-base you need
Compacted MOT Type 1 weighs roughly 2.1 tonnes per cubic metre. At 100mm deep, one square metre needs about 0.1m³, or a little over 0.2 tonnes — so one tonne covers approximately 5m² at 100mm compacted depth. For a driveway at 150mm, that drops to around 3m² per tonne.
Order more than the bare calculation. Type 1 loses roughly 20-25% of its loose depth when it is compacted, so to finish at 100mm you need to spread closer to 125-130mm loose. The sub-base should also extend about 100-150mm beyond the edge of the paved area so the perimeter slabs are not sitting on the edge of the layer.
Once you know your area, the coverage calculator will work out slab quantities to match.
Compaction: the step most DIY patios get wrong
Sub-base depth gets all the attention, but compaction is what turns loose stone into a structural layer. Tipping 100mm of Type 1 into a hole and levelling it with a rake produces a layer that will settle under the first winter's worth of load.
- Compact the subgrade first. Before any stone goes in, run the plate over the excavated ground. Any spot that pumps, springs or holds water is a soft spot — dig it out and fill it with Type 1 rather than building over it.
- Spread in layers. No more than about 75-100mm loose at a time. A vibrating plate compactor cannot consolidate a deep layer; it will tighten the top and leave the bottom loose.
- Compact each layer fully. Several passes in different directions, until the plate stops sinking in and starts riding across the surface. The sound changes noticeably when a layer is done.
- Blind the surface. A thin scatter of finer material worked in gives a tight, closed surface for the mortar bed to sit on.
- Check levels as you go. Correcting a layer is easy; correcting the finished paving is not.
A wacker plate is the right tool for a patio. For a driveway build-up, or on heavy clay, a heavier plate or a roller earns its hire fee.
Setting the fall before you lay
Water has to leave the surface, and the sub-base is where you build that in. The usual working minimum for a patio is 1:80 — about 12.5mm of drop per metre — and many installers work to 1:60 (around 17mm per metre) to be certain. Under about 1:80, surface water sits, and standing water is what feeds algae, moss and the lichen that becomes black spot.
The fall runs away from the house, and the water needs somewhere to go once it gets there — a border, a channel drain, or a permeable margin. Set the fall in the sub-base and carry it through the bedding layer; do not try to create it by varying mortar thickness across the patio.
Where the rules change
- Driveways and parking. 150mm compacted minimum, often 200mm, and thicker slabs to match. Vehicle loading is a different structural problem to foot traffic.
- Heavy clay. Consider a geotextile membrane between subgrade and sub-base. It stops the clay and the stone migrating into each other and keeps the sub-base doing its job.
- Made ground or a filled site. If you do not know what is under you, dig a trial hole before pricing the job.
- Near trees. Roots move, and they will keep moving after you have finished. Take advice before paving inside a mature tree's root zone.
- Soft or waterlogged ground. Excavate deeper and replace with more Type 1 rather than compacting harder on top of a problem.
The mistakes that cost the most
- Laying straight onto soil or sand. The single most common cause of a sunken, rocking patio — see laying paving slabs on soil for what actually happens.
- One deep layer instead of several shallow ones. Looks compacted, is not.
- Using pea shingle or single-sized gravel. It cannot interlock, so it cannot carry load.
- Stopping the sub-base at the slab edge. Perimeter slabs then sit half on stone, half on nothing.
- Leaving the fall until bedding. You end up with mortar thickness varying from 20mm to 60mm across the patio, which cures and behaves inconsistently.
- Building above the DPC. Expensive to discover afterwards, and a genuine damp risk.
Once the sub-base is right
With a compacted, correctly-falling sub-base in place, the rest of the job follows the standard sequence: a full mortar bed, priming slurry on the back of porcelain slabs, then jointing. The patio laying guide covers that end to end, adhesives and priming covers the bonding decision, and jointing finishes it. If you are working over an existing concrete slab instead of digging out, that is a different build-up — see laying paving slabs on concrete.
Not decided on a material yet? Order a sample and see it in your own light before you commit to a full pallet.
Work out your exact order in seconds
Our coverage calculator turns your patio size into the precise number of slabs and packs — 10% waste allowance included.
Free delivery, £0.98 samples, breakage guarantee
Every order ships free with no minimum spend. Order a £0.98 sample first, choose your delivery date, and if a slab arrives broken we replace it — no quibbling.
Frequently asked questions
How deep should a patio sub-base be?
Around 100mm of compacted MOT Type 1 for a domestic patio carrying foot traffic. Driveways and anything taking vehicles need 150mm or more. Add the bedding layer (30-40mm) and your slab thickness to get the total excavation depth, which is usually 150-160mm for a 20mm porcelain patio.
Can I lay a patio without a sub-base?
You can, but it is the most common reason patios fail. Without a compacted granular layer, seasonal ground movement and load go straight into the bedding and the slabs, which is what produces rocking slabs, sunken corners and open joints after the first winter.
What is MOT Type 1?
A graded crushed aggregate defined by Clause 803 of the Department for Transport Specification for Highway Works. It runs from roughly 40mm stone down to dust, and that spread of particle sizes is what lets it interlock and go rigid when compacted. Single-sized gravel cannot do this.
How much MOT Type 1 do I need per square metre?
At 100mm compacted, roughly 0.2 tonnes per square metre, so about one tonne per 5m². At 150mm for a driveway, about one tonne per 3m². Order extra: Type 1 loses around 20-25% of its loose depth once compacted, so you spread about 125-130mm to finish at 100mm.
Do I need to compact the sub-base?
Yes, and in shallow layers of no more than 75-100mm at a time. A vibrating plate tightens the top of a deep layer and leaves the bottom loose, which settles later. Compact the excavated ground first as well, and dig out any soft spots rather than building over them.