
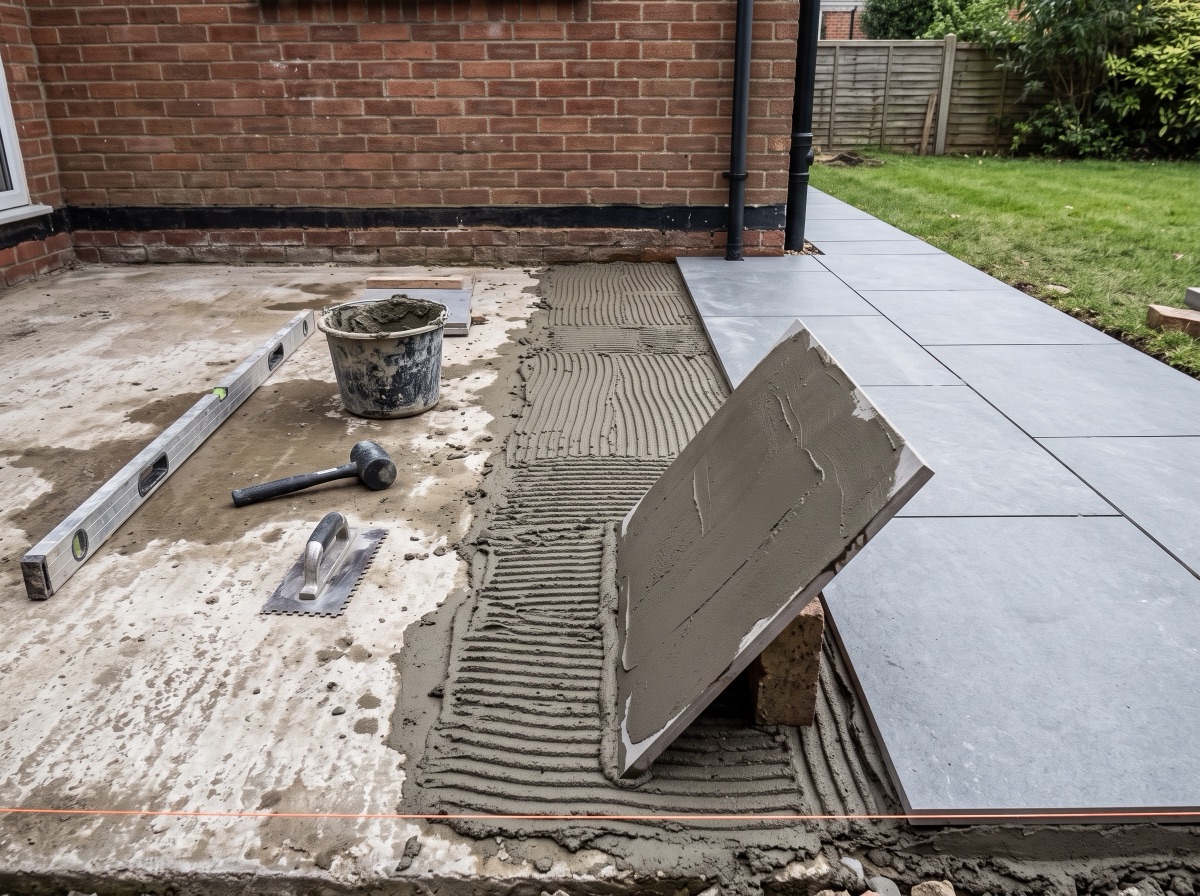
You can lay slabs over an existing concrete base if it is sound, falls away from the building and still leaves 150mm below the damp-proof course once the new surface is on. Bond them with a full mortar bed or a C2 S1 exterior adhesive — never on five dabs.
Yes — provided the concrete is sound, already falls away from the building, and the finished paving will still sit at least 150mm below the damp-proof course. Where those hold, an existing slab is an excellent base: it is already the structural layer, so you skip the excavation entirely. Bond the slabs on a full mortar bed or a C2 S1 exterior adhesive, never on dabs.
The four checks to make before you commit
Laying over concrete is either the easiest patio you will ever build or an expensive mistake, and which one it turns out to be is decided before you order a single slab.
- Is the concrete sound? Walk it, look for cracking, and tap across the surface with a hammer or a bar. A dull, hollow note means delamination. Fine surface crazing is cosmetic. A crack you can fit a coin into, one that steps in height across its length, or one that has visibly moved is structural — that needs resolving first, because it will come back through whatever you lay on top.
- Which way does it fall? Put a level on it. You need roughly 1:80 — about 12.5mm per metre — running away from the building. Concrete that falls towards the house, or that is dead flat and puddles, has to be corrected in the build-up, and correcting fall with bedding thickness has limits.
- Will you still clear the DPC? Find the damp-proof course — usually a visible line two courses up from the ground. Add your bedding thickness and slab thickness to the current concrete level. If the finished surface lands within 150mm of that DPC, you cannot simply lay on top. This is the check that most often kills the idea.
- Where does the water go? Concrete is impermeable and your new surface will be too. The water has to reach somewhere legitimate — a border, a channel drain, a soakaway. It must not discharge against the house, onto a neighbour's land, or into a foul drain.
Pass all four and you have a genuinely good base. Fail the DPC check or the soundness check and the honest answer is to break out and build properly from the ground up — see the sub-base guide.
Method 1: full mortar bed
The traditional approach, and the more forgiving of the two. A full wet bed of around 25-40mm, typically 4:1 sharp sand to cement, laid solid under the whole slab.
- It absorbs irregularity. If the concrete is sound but slightly uneven, or the fall needs nudging, the bed thickness gives you room to work.
- It suits natural stone. The standard method for Indian sandstone and limestone.
- Porcelain still needs priming. Brush a cement-based priming slurry onto the back of every porcelain slab before it goes down — non-negotiable, and the reason porcelain debonds from otherwise perfect beds.
- It costs height. 25-40mm of bed plus the slab. On a marginal DPC clearance, this is the method that fails the check.
Method 2: C2 S1 adhesive (thin bed)
Bonding straight to the concrete with an exterior-rated tile adhesive. On the bag you are looking for C2 (improved cementitious adhesion) and S1 (deformable, so it tolerates thermal movement), rated for external use — the classification comes from BS EN 12004. The adhesives guide covers the codes in full.
- It saves height. A typical bed is 6-10mm rather than 25-40mm — often the difference between clearing the DPC and not.
- It demands a good base. Adhesive has no capacity to take up unevenness. The concrete must already be flat and already fall correctly.
- It is unforgiving on prep. Clean, sound, dust-free, cured, and primed per the manufacturer's instructions for your substrate.
- Solid bed only. Notched trowel on the base plus back-buttering the slab. Lift your first slab back off and check the coverage — you want effectively full contact.
Which method to choose
- Height is tight against the DPC — adhesive, if the concrete is flat enough to allow it.
- The concrete is sound but uneven or the fall needs adjusting — mortar bed.
- Natural stone — mortar bed, as standard.
- Porcelain on a good flat slab — either works; adhesive is faster and thinner, mortar is more forgiving.
- You are unsure about the concrete — mortar bed. It tolerates more.
Preparing the concrete
- Clean it back. Remove moss, algae, oil, paint and any loose or flaking material. Degrease oil-contaminated patches properly — adhesive will not bond through oil.
- Deal with the defects. Cut out and make good spalled or delaminated areas. Fill static shrinkage cracks.
- Check the fall again after cleaning, over the whole area rather than in one line.
- Prime as specified. Follow the adhesive or slurry manufacturer's guidance for a concrete substrate; dense power-floated concrete in particular usually needs specific preparation.
- Set out dry first. Lay a run out unbonded to check falls, joint widths and cuts before anything is committed. Cutting is easier planned than improvised — see the cutting guide.
Can you lay over an existing patio?
Usually the wrong call, even though it looks like the same job. Laying new slabs over old ones means you inherit every bond failure underneath — any slab that is already loose or hollow becomes a defect in your new surface, and you cannot see which ones they are. You also add the full thickness of the old slabs and their bed to your height problem, which almost always breaks the DPC clearance.
Lifting old slabs is unpleasant work but it is a day, and it lets you see and fix what is underneath. The exception is a genuinely sound, fully-bonded, correctly-falling concrete slab that happens to have tiles on it — and even then, removing them is the safer route.
Cracks, movement and joints
Reflective cracking is the failure mode people do not anticipate. A crack in the base that still moves will telegraph up through bedding and slab within a season or two, because nothing in a paving build-up is strong enough to restrain a moving substrate.
- Static shrinkage cracks — normal in concrete, generally fine to lay over once filled.
- Cracks that move, step, or run the full width — a structural symptom. Find out why before paving over it.
- Existing movement joints — carry them up through the paving. Do not bridge them with a bonded slab.
- Large areas — allow for perimeter movement at abutments rather than butting the paving hard against walls.
Jointing and finishing
Once bedded and cured, joint the paving with an appropriate exterior compound rather than a dry sand-and-cement brush-in — over an impermeable base, water sits in the joints and a weak jointing mix breaks down quickly. The jointing guide covers the options and the grout selection guide covers porcelain specifically.
Give the bed its full cure before trafficking, and keep the surface off the DPC line at the house wall.
The mistakes that cause failure
- Spot bonding. Five dabs under a slab leaves voids that crack under point loads, hold water and telegraph as ghost stains. Solid bed, every time, both methods.
- Skipping the priming slurry on porcelain. The single most common porcelain debonding cause.
- Ignoring the DPC. Discovered too late, this is a full lift-and-relay.
- Paving over a moving crack. It comes back through.
- Indoor tile adhesive. Not frost-rated, wrong flexibility, fails in the first winters.
- No drainage plan. An impermeable surface with nowhere for the water to go floods something eventually.
Not sure which material suits the job? Compare the options in porcelain vs sandstone, work out quantities with the coverage calculator, or order a sample first. If it turns out the concrete has to come up after all, the full patio guide starts from bare ground.
Work out your exact order in seconds
Our coverage calculator turns your patio size into the precise number of slabs and packs — 10% waste allowance included.
Free delivery, £0.98 samples, breakage guarantee
Every order ships free with no minimum spend. Order a £0.98 sample first, choose your delivery date, and if a slab arrives broken we replace it — no quibbling.
Frequently asked questions
Can you lay paving slabs on concrete?
Yes, if the concrete is structurally sound, already falls away from the building at around 1:80, and the finished paving will still sit at least 150mm below the damp-proof course. Where those conditions hold the existing slab is the structural layer, so no excavation or sub-base is needed.
Do you need a sub-base if you are laying on concrete?
No — a sound concrete slab is already performing the sub-base function. That is the main advantage of the method. What you do still need is a correct fall, adequate DPC clearance, somewhere for surface water to go, and a full bonded bed under every slab.
What adhesive do you use for slabs on concrete?
An exterior-rated cementitious tile adhesive classified C2 under BS EN 12004, ideally S1 deformable so it tolerates thermal movement. Apply as a solid bed with a notched trowel plus back-buttering. Standard indoor tile adhesive is not frost-rated and typically fails within the first winters.
Can you lay slabs on top of an old patio?
Usually not advisable. You inherit every loose or hollow slab underneath as a hidden defect, and the combined height of the old slabs and their bed almost always breaks the 150mm damp-proof course clearance. Lifting the old paving is a day's work and lets you see what you are building on.
How thick is the mortar bed for slabs on concrete?
Around 25-40mm for a full wet bed, typically 4:1 sharp sand to cement, laid solid under the whole slab. A C2 S1 adhesive bed is much thinner at roughly 6-10mm, which is often what makes the difference when damp-proof course clearance is tight — but it needs a flatter base.