
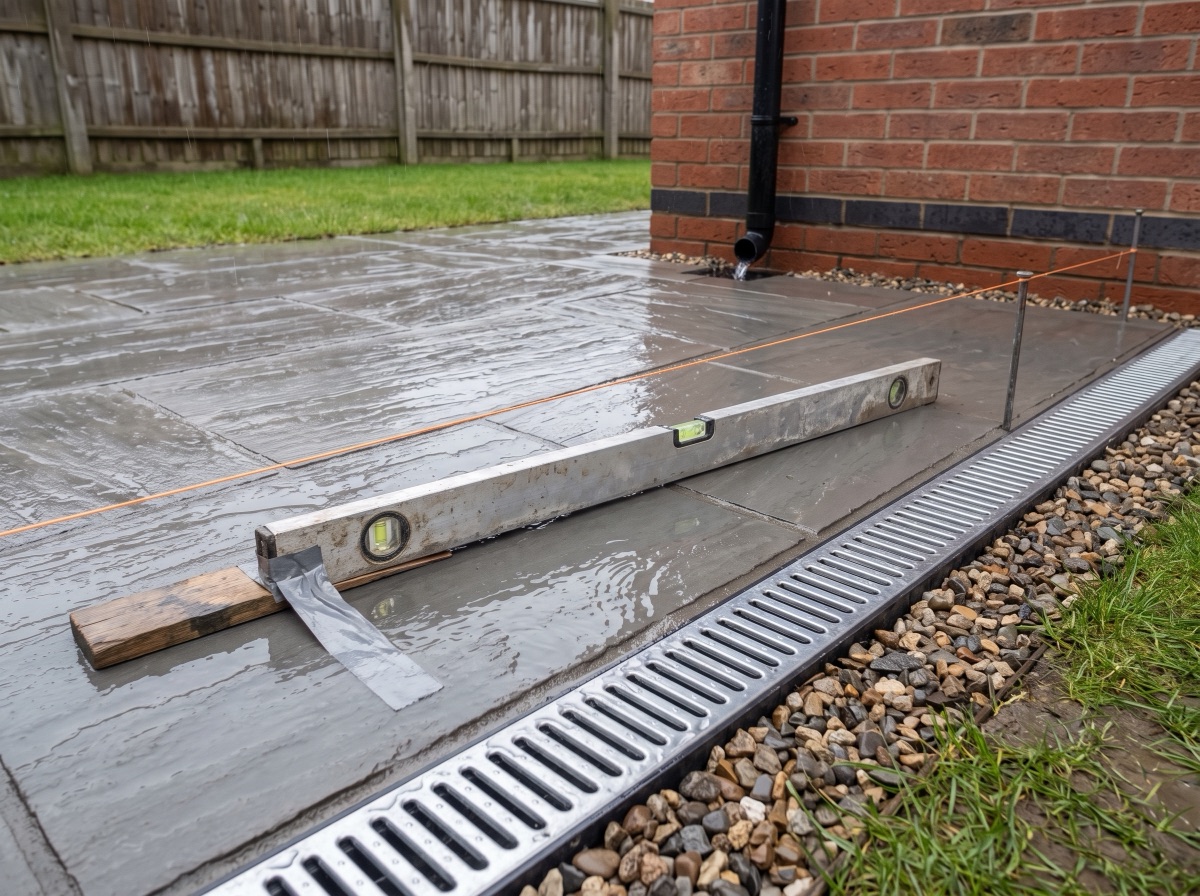
A patio needs a minimum fall of about 1:80 — 12.5mm per metre — running away from the building, and many installers work to 1:60. Set the fall in the sub-base rather than the mortar, and make sure the water has somewhere legitimate to go once it reaches the edge.
A patio needs a fall of at least 1:80 — that is 12.5mm of drop per metre — running away from the house. Many installers work to 1:60, about 17mm per metre, for certainty. Build the fall into the sub-base and carry it through the bedding rather than creating it with varying mortar thickness, and make sure the water has somewhere legitimate to go when it gets to the edge.
What "fall" means, and the number you need
Fall is simply the deliberate slope built into a paved surface so water runs off it instead of sitting on it. It is expressed as a ratio: 1:80 means the surface drops 1 unit for every 80 travelled.
- 1:80 = 12.5mm per metre. The usual working minimum for a patio.
- 1:60 = about 17mm per metre. What a lot of installers actually build to, because it gives margin for the small inaccuracies of a real site.
- Across a 4m patio, 1:80 is 50mm of total drop and 1:60 is about 67mm — a visible difference at the edge, and worth planning for.
Going much steeper than 1:40 starts to be noticeable underfoot and awkward for garden furniture. Somewhere between 1:80 and 1:60 is the sweet spot for almost every domestic patio.
Why flat patios fail
A patio laid dead level does not stay merely damp — it collects a set of problems that all trace back to standing water:
- Ponding and puddles that stay for days after rain.
- Algae and moss, which need permanent moisture to establish, making the surface slippery.
- Black spot lichen on natural stone, which colonises surfaces that stay wet — see removing black spot.
- Frost damage. Water sitting in joints and open pores expands as it freezes, which is what loosens jointing and spalls slab edges.
- Efflorescence that keeps returning, because water is still moving through the build-up — see white marks on paving.
- Damp against the house if the water has nowhere to go but the wall.
Almost none of these read as a "drainage problem" to the person living with them. They read as a slab problem, a cleaning problem, or a jointing problem. They are all the same fault.
Which way the fall runs
Away from the building, always. That is the non-negotiable one. Beyond it you have choices:
- Single fall — the whole patio slopes one way, towards a lawn, border or drainage channel. Simplest to set out and the right answer for most rectangular patios against a house.
- Cross fall — the surface falls towards one side as well, useful where the run is long or the discharge point is at a corner.
- Falling to a central channel — for a patio enclosed on several sides, where there is no free edge to shed to. More work, and it needs a drainage run designed in from the start.
Alongside the fall, the finished paving must sit at least 150mm below the damp-proof course. Fall and DPC clearance are two separate requirements and both have to be met — see the sub-base guide for how they shape your dig depth.
Setting the fall out
- Fix your high point. Usually the line against the house, set to leave the 150mm DPC clearance.
- Calculate the total drop. Measure the run away from the house and multiply: 4m at 1:80 is 50mm; 5m at 1:60 is about 83mm.
- Set string lines to the finished levels. Pins at the high and low edges with the line pulled taut between them, at the level the top of the paving will sit.
- Use a gauge, not guesswork. The reliable trick is a level with a shim taped under one end — cut the shim to the drop over the level's own length (a 1m level at 1:80 needs a 12.5mm shim). When the bubble reads centre, the surface is at the right fall.
- Build the fall into the sub-base. Compact the sub-base to the fall, so the bedding layer stays a consistent thickness across the whole patio.
- Check as you lay, every few slabs, in both directions. Drift is easy and cumulative.
The reason step 5 matters: if you level the sub-base flat and then try to create fall by varying mortar from 20mm at one end to 60mm at the other, the bed cures and behaves differently across the patio, and the thick end is far more likely to settle.
Where the water is allowed to go
Getting water off the paving is half the job. The other half is where it goes next, and this part has rules.
- A lawn, border or gravel margin — the simplest answer for a rear patio, provided the ground can actually absorb it and it is not simply routed against a wall.
- A linear channel drain along the low edge, piped to a soakaway or surface water drain. The usual solution where the patio meets a wall, fence or another hard surface.
- A soakaway, sited well away from the building — general guidance is a minimum of 5m from any structure, and it needs ground that will actually take the water. Clay often will not.
Two hard constraints. Surface water must not be discharged onto a neighbour's land, and it must not be connected into a foul drain. Both cause real problems and both can land you with a bill to put right.
The front garden rule
Worth knowing if the paving is at the front rather than the back. In England, since October 2008, laying an impermeable surface of more than 5m² in a front garden requires planning permission, unless the water drains to a permeable area within your own property rather than running onto the road.
This applies to front gardens and driveways. Rear patios are generally covered by permitted development rights. If you are paving a front drive, plan the drainage before the material — it changes what you are allowed to build. Design ideas for the front are in the driveway paving guide.
Special cases
- Patio enclosed on all four sides. There is no free edge, so drainage has to be designed in: a channel, a gully, or a permeable margin. Decide this before you dig.
- Sloping garden. Terracing gives you level areas with drainage between them rather than one steep patio — see terracing a sloping garden.
- Ground that falls towards the house. The most difficult case. You need a drainage run along the house line, and possibly a level change, before any paving goes down.
- Large patios. Over about 6m of run, consider a cross fall or an intermediate channel rather than piling up an increasingly awkward drop at one end.
- Porcelain. Its near-zero porosity means every drop of rain becomes surface water. Fall matters more on porcelain than on natural stone, not less.
Checking a patio that already ponds
If an existing patio holds water, find out whether the problem is fall or a settled area before deciding what to do. Lay a long level across the puddle and look at the reading: a general shortfall of fall across the whole surface is a build issue, whereas a dip in one place is usually a settlement problem in the bed or sub-base under a small group of slabs.
Localised dips can often be fixed by lifting and re-bedding the affected slabs — the loose slab guide covers the method. A patio with no meaningful fall anywhere is a relay, because there is no way to add slope to a finished surface.
Planning a new one? Work out quantities with the coverage calculator, or order a sample to check the material in your own light first.
Work out your exact order in seconds
Our coverage calculator turns your patio size into the precise number of slabs and packs — 10% waste allowance included.
Free delivery, £0.98 samples, breakage guarantee
Every order ships free with no minimum spend. Order a £0.98 sample first, choose your delivery date, and if a slab arrives broken we replace it — no quibbling.
Frequently asked questions
What fall should a patio have?
At least 1:80, which is 12.5mm of drop per metre, running away from the building. Many installers work to 1:60 — about 17mm per metre — to allow for the small inaccuracies of a real site. Steeper than about 1:40 starts to feel noticeable underfoot and makes furniture awkward.
Which way should a patio slope?
Away from the house, always. Beyond that you can use a single fall towards a lawn or border, a cross fall towards one corner, or a fall to a central channel where the patio is enclosed. The paving must also finish at least 150mm below the damp-proof course.
How do you set a fall when laying a patio?
Fix the high point at the house, calculate the total drop for the run, then set string lines at the finished paving level. Tape a shim under one end of a level — 12.5mm under a 1m level gives 1:80 — so a centred bubble reads the correct fall. Build the slope into the compacted sub-base, not into varying mortar thickness.
Where can patio water drain to?
A lawn, border, gravel margin, a linear channel drain piped away, or a soakaway sited at least 5m from any building in ground that will absorb it. Surface water must not be discharged onto a neighbour's land and must not be connected into a foul drain.
Can I lay a patio completely flat?
You can, and it is a common cause of later problems. Without fall the surface holds water, which brings algae and moss, black spot on natural stone, frost damage to joints and slab edges, recurring efflorescence, and potentially damp against the house wall. Fall cannot be added to a finished patio.